The 'improved courtyard' thread

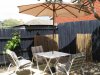
There doesn't seem to be have been a lot lately about improving small courtyards, even though these upgrades require no trades, little skill and can be very cheap.

The following describes work done to a courtyard of a cheap but well-located unit.

Several problems were identified in what was otherwise a good property:

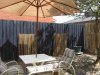
* No courtyard suitable for outdoor living
* Rotting timber around washing line needed replacing
* Only a narrow (400mm wide) path around to the washing line
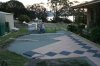
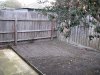
* A large underused yard that appeared out of sight/out of mind due to the above narrow path and cluttered tree growth.

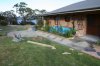
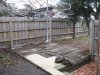
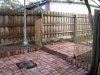
Here's some pictures of a messy area around the washing line. The area was a mix of pavers and rotting wood. Pavers were also used for the path to the washing line which was way too narrow (400mm).

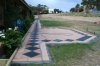
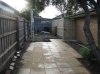
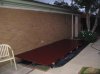
All this was replaced with bricks, as shown in the before & after pics. The opportunity was taken to widen the path to improve access to the washing line and provide a sense of spaciousness previously missing. All up about 400 bricks were used @30c ea.

There was a lot of digging as the site wasn't level but I wanted to maintain a curve to not undermine the washing line. However I was able to reduce the size of a step and change the slope a little (for run-off).

Peter
 

Attachments

  • IMG_0048sm.jpg
    IMG_0048sm.jpg
    67.2 KB · Views: 288
  • IMG_0020sm.jpg
    IMG_0020sm.jpg
    60.2 KB · Views: 326
Last edited by a moderator:
Here's more, this time of the courtyard near the back door.

The before picture contained a lot of unused dirt and no room for an outside table & chairs.
This area was initially expanded with pavers salvaged from the washing line area.

More pavers were needed (30) and it was this that was the main cost of the project (about $5 ea).

Other improvements included painting the fence, a bamboo screen and bamboo along the fence to break up its colour. Most bamboo came from a $2 shop - packs of 12 x 1500mm stakes cost $3 but some was salvaged. The table, chairs and shade umbrella were also salvaged so cost nothing.

During the digging a rusted winder and trunk of a clothes hoist was found. This was planted in the ground and forms a small feature near the bamboo partition.

While finishing touches remain, most attention can be paid to the remainder of the yard (it's a large 'L' before it becomes overgrown. Possible ideas include a shed, an additional shade umbrella and paved area and a junk heap (fenced off from the rest), though there's room for all three!
 

Attachments

  • Patio with umbrella 1sm.jpg
    Patio with umbrella 1sm.jpg
    77.8 KB · Views: 208
  • Patio with umbrella 2sm.jpg
    Patio with umbrella 2sm.jpg
    82.5 KB · Views: 192
  • IMG_0039sm.jpg
    IMG_0039sm.jpg
    62 KB · Views: 196
Nice improvement.
Did you do it yourself?

Thanks! Yep, a diy job. The heaviest work (digging and paving) of each section was mostly done in about 2-3 weeks (an hour before & after work and weekends). Total budget won't have been much over $500, mostly on pavers, the rest on bamboo & paint.

Would love to see what others have done!

Peter
 
Last edited by a moderator:
If you have the room Spider why dont you make a raised area with sleepers or bricks/blocks to form a vegie patch.
They seem quite fashionable these days.
Also seems to give prospective tennants a warm fussy feeling to see vegies or herbs growing.
cheers
yadreamin
 
If you have the room Spider why dont you make a raised area with sleepers or bricks/blocks to form a vegie patch.
That's exactly what I just finished last week.

This is what the area looked like before.....


22 Besser blocks ($2.8 each) and 11 cappings ($2.10), a bit of scrap trench mesh and a couple of bags of cement.


After rendering & laying weedmat ($20) & 10mm gravel ($100) around it. A bag of premixed render ($12), coloured oxide ($12), 200kg of 20mm recycled concrete in the bottom ($10) & a few rocks. With $88 of 10mm gravel around it and weedmat.


Geotex over the 20mm gravel and then 1.5t of premium topsoil ($50/t) & $25 of herbs & veggies.


Not sure what the payback period will be.
 
If you have the room Spider why dont you make a raised area with sleepers or bricks/blocks to form a vegie patch.

Plenty of room :)

There is such an area (behind the bamboo screen and visible on the 'before' washing line pic) but there isn't yet anything growing in it!

It's a step up from the path and not quite level so I haven't worked out what to do with it yet.
 
This is a court yard I had done last year. Cost a small fortune but still worth it I think.
 

Attachments

  • IMG_4881a.JPG
    IMG_4881a.JPG
    35.5 KB · Views: 150
  • IMG_4884a.JPG
    IMG_4884a.JPG
    35.1 KB · Views: 151
  • IMG_4940a.JPG
    IMG_4940a.JPG
    35.1 KB · Views: 163
Lighting

Time for another installment.

Not a lot of earth moving or paving, but am turning attention to outdoor lighting (2/3 of the courtyard is in complete darkness at night) with 2 small lighting projects complete and another pending, as follows:

1. Solar garden lighting. Not something I'd do in a rental property (as the lights are easily removable), but worthwhile for a PPOR. Bollard lights are nice looking but quite dear (Beacon Lighting has some nice ones) but I went for cheaper types that have a ground stake.

K-Mart has a special at the moment - Box of 10 solar LED lights for $30 (half price) so I grabbed those and am glad I did.

2. Automatic solar powered LED tree lights (or why can't Christmas be 365 days?). Dick Smith has a set for $25 for a length of about 50 LEDs on a wire with solar panel & rechargeable battery included. Has various selectable flashing patterns (or continuously on), though the one I like most (slow fade) isn't there. OK for a smallish tree, but two or three would be needed for a larger tree.

3. Lighting a dark courtyard. This will make the biggest difference as it provides area lighting. It's several lights attached to the eaves of a windowless wall to light a long courtyard. If an IP you'd go for a mains 240 volt system using standard globes.

But in this case I'm going for cheap and 12 volts with an eye to future solar power. Plus I can have accessory sockets for 12 appliances outdoors. Especially as I have a spare car battery and charger that can run the thing for the time being.

Options included 1. Strip flouro light, 2. compact flouro light (Jaycar have 12 volt ones), 3. LED, or 4. Incandescent globe (either screw in or automotive).

Re 1. solar and auto suppliers had flouro tubes and holders, but they seemed to be more for indoor use. Also non-standard tubes might be hard to get in the future. Re 2, I was going to go for that, but Jaycar had the lights but almost no sockets in the state, so gave that a miss. 3. LED - the ones I saw were more portable use and not fixed permanent outdoor use.

So I went to Supercheap Auto and got 4 white trailer lights for about $6 a pop. Cheap and suitable for outdoor use so they're a winner. These have festoon globes in them that I think are common enough but aren't all that efficient. BUT Dick Smith have LED substitutes that could go in if desired. Or something else cobbled up with superbright LEDs that are now available.

They're rated at 18 watts, but consumption was only about 0.8A, so that's nearer to 10 watts @ 12v.

This part is not finished, but a test with just a single light was encouraging, so 4 will be even better. If it's a bit taxing on the battery, I could just remove 2 globes and keep them as spares.

Anyway there's been a big change in the last 5-10 years - LEDs have transformed lighting and their use with solar has made them very cheap and certainly worth doing now.

Peter
 
An update:

Since the previous posts there has been three major additions: (i) a new fence, (ii) extra paving and (iii) a new north-facing deck.

The fence was professionally installed and was needed as the old one was falling over. The paving was DIY. The courtyard was also DIY, but with timber cut to size by the supplier.

Outdoor storage is provided by an unused outdoor dunny - rearranging the door so it opens outwards instead of inwards has created room for two shelving units. Plus the bowl and cistern remain in case it becomes needed for its intended use. The far end of the courtyard remains unused, so could accommodate a shed and garden if required.

Costs have spiralled since last time, with each project costing approx $500 - 700 a piece. However the large courtyard is the property's main selling point and the projects have realised much (though not all) of its potential. Hence I don't believe they are overcapitalising.
 

Attachments

  • north courtyard 1.jpg
    north courtyard 1.jpg
    57.6 KB · Views: 167
  • 02 08 2009 deck painted 1.jpg
    02 08 2009 deck painted 1.jpg
    41.2 KB · Views: 158
Looke great Peter, look forward to a picture when completed, the barren brick wall needs something afixed though?

Theses type of posts with photos are definetly food for thought
 
you're a legend, Peter!

Thanks for your interesting posts... am looking at turning the smallish-backyard we have into something similar to yours. The veggie patch will be first, yours looks great.

You're doing a great job.

One question - are you adding things "as you go", or did you do a plan/design first? On paper? I am stuck with trying to draw my plans, I can't get them to look realistic (esp. trying to represent the different materials - like pebbles, grass, pavers, etc.) ... and I'm thinking of just doing things "as I go" and going with gut instincts.... ?
 
Thanks Wendoze

First step is to get an aerial view of the property through Google Maps

Then save it as a gif or jpg file that you can write on (with windows paint)

Alternatively make a plan like attached

Consider what you want, possible uses for things, access and orientation when positioning things. So you are progressing with the end in mind but only do one thing at a time (each project might take a few weekends each).

I did have a rough overall plan, noting the advantages of various parts of the yard. Hence you don't put a garden shed in a sunny place near the house that would be best for a deck. And some plants need light rather than be under a tree (an error I made).
 

Attachments

  • plan for home.JPG
    plan for home.JPG
    60.7 KB · Views: 110
Back
Top