
Install the app
How to install the app on iOS
Follow along with the video below to see how to install our site as a web app on your home screen.
Note: This feature may not be available in some browsers.
You are using an out of date browser. It may not display this or other websites correctly.
You should upgrade or use an alternative browser.
You should upgrade or use an alternative browser.
2nd duplex reno from A to Z
- Thread starter Celeste
- Start date
More options
Who Replied?Some more....
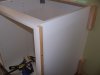
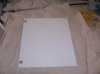
Ok, now the frame is finished you glue on the laminate with Quik Grip or similiar. You paint it on the frame and then the back of the laminate, wait until its touch dry then put the laminate on the frame, do it slowly and carefully as you only get 1 go and you cannot slide it around into position. This is why you cut it larger and then trim to be an exact fit. Only cover the faces of the frame you see. see photo 2 & 3, the base is all finished.
If you find the corners are not so great you can attach a peice of 6mm aliminium angle, cut it to the height of the frame and glue it on with liquid nails.
I used 1200mm lengths of MDF therefore I needed to join 2 frame together on both sides of the kitchen, join the frames together B4 laminating. I uses 2 x 40mm wood screws.
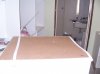
Next, pop the frame in position and check levels, use little peices (slivers) of wood and pop it under the frame to make it level. You can glue them in position, make sure they are not sticking out on the face side of the frame. You can see one in photo 2 top right corner of frame. Do a good job on this stage as it will make installing the cabinets a breeze.
Now install the cabinets.
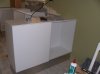
One thing to keep in mind when planning your Kitchen, see photo 2, I have the back of one cabinet butting onto the side of another and then I will have another cabinet against this cabinet in reverse see photo 3. (1 x cabinet opens into the lounge and 1 into the kitchen - this is my breakfast bar) In this case you need filler peices. The cabinets are 600mm wide and 580mm deep, also you need to allow for the doors or draws to open.
I will do a drawing and finish this bit in the next post.
Ok, now the frame is finished you glue on the laminate with Quik Grip or similiar. You paint it on the frame and then the back of the laminate, wait until its touch dry then put the laminate on the frame, do it slowly and carefully as you only get 1 go and you cannot slide it around into position. This is why you cut it larger and then trim to be an exact fit. Only cover the faces of the frame you see. see photo 2 & 3, the base is all finished.
If you find the corners are not so great you can attach a peice of 6mm aliminium angle, cut it to the height of the frame and glue it on with liquid nails.
I used 1200mm lengths of MDF therefore I needed to join 2 frame together on both sides of the kitchen, join the frames together B4 laminating. I uses 2 x 40mm wood screws.
Next, pop the frame in position and check levels, use little peices (slivers) of wood and pop it under the frame to make it level. You can glue them in position, make sure they are not sticking out on the face side of the frame. You can see one in photo 2 top right corner of frame. Do a good job on this stage as it will make installing the cabinets a breeze.
Now install the cabinets.
One thing to keep in mind when planning your Kitchen, see photo 2, I have the back of one cabinet butting onto the side of another and then I will have another cabinet against this cabinet in reverse see photo 3. (1 x cabinet opens into the lounge and 1 into the kitchen - this is my breakfast bar) In this case you need filler peices. The cabinets are 600mm wide and 580mm deep, also you need to allow for the doors or draws to open.
I will do a drawing and finish this bit in the next post.
Attachments
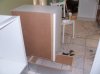

filler peices....
You need to allow for the doors/draws etc, which means at least a 20mm clearance.
I added a 20mm filler peice to the side of the 1st cabinet, it was an off cut from the MDF for the frame. to make it white you can buy laminate trim in rolls that is about 25mm wide, you just iron it on and trim with a paint scrapper then a light sand on the edges. See photo 2 in the previous post.
I also added a larger peice to the back of the other cabinet, see photo 3 last post. Then joined them together.
Attachments

More on the cabinets.....
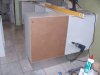
So, now I have 1 cabinet for the breakfast bar sorted, the other needs help.
As you can see in photo 1 I have the ugly back showing, I need to cover it. Keeping in mind that the cabinet on the right will have a door attached therefore it will come out a further 20mm, so I need something 20mm thick.
Depending on what cabinets you are using, you can either have a cover piece made (know as and end panel), or some kit ones have end panels you can buy. For this one which is IKEA Arlig they do not have end panels, so I am using a door as a cover panel, see photo 2.
Now, the door is slightly smaller (just a few mm) than the cabinet, so some of the backing will be seen. In this case I have ironed on some trim around all 4 edges of the back. Then I will glue and screw the door onto the back of the cabinet. see photo 3
Hint - if this is your 1st time, I suggest you hang the door on the other cabinet adjust it to sit level/straight and then put the panel on the other cabinet to minmic the door. In this case I matched up the edges on the left hand side which is the 1 st side seen and left a little gap at the top and the bottom. This should mimic the door of the cabinet that opens.
As my daughter says " walla!!! breakfast bar!!
Attachments
Now a photo of the finished breakfast bar.
Note - I used overhead cabinets for the breakfast bar as they are with doors only 370mm deep. That way I can put a 700mm wide bench top on there and have leg space for stools on the lounge side. Thus saving space in a small kitchen.
Photo 2 - I made up a frame from the left over MDF to the height I want the over heads (600mm) + bench thickness (33mm) to help me install the over heads, worked a treat!! and now I can take from reno to reno.
That's all for now....
Note - I used overhead cabinets for the breakfast bar as they are with doors only 370mm deep. That way I can put a 700mm wide bench top on there and have leg space for stools on the lounge side. Thus saving space in a small kitchen.
Photo 2 - I made up a frame from the left over MDF to the height I want the over heads (600mm) + bench thickness (33mm) to help me install the over heads, worked a treat!!
and now I can take from reno to reno.That's all for now....
Attachments

Hi guys
I need to jump around at the mo, to get things ready for tradies.
Kitchen finished to the stage where I can get the final measurements to the bench maker.
Shower screen measured up and order yesturday. 1-2 weeks
I scrapped and sanded the last of the gutters and fascia's today out the back, ready for painting tomorrow - under coat 1st zimmers.. something 1,2,3. this stuff hides lots of sins. lucky most of these fascia's will have the patio attached to it so I do not have to be very particular on the finish, as you will not see them much. My patio changes are all approved, it should go up in a couple of weeks.
gutted the laundry and patched the walls ready for painting. Tho I still have the skirt tiles to get off in the laundry, the toilet ones were glued on with adhesive, the lick and stick type, so really easy to get off.
The laundry how ever, the tiles have been cemented on, I need hubby's ? I can never remember what it's called ? Impact drill ? you know mini jack hammer thingy.
As the weather has warmed up, I will be outside in the mornings for 2-3 hours and then inside. I will be working on the fascias ready for the patio and the laundry, I want all the walls painted etc B4 the tiler who comes saturday the 1st. Then I need to grout the bathroom ready for the showerscreen and plumber.
Well got to go pickup Paris (6yr old) from her play date. so that all for now.
Sorry no pictures today.
Celeste...I'm just stunned. I'd never have the courage to do a kitchen like this...too scared I'd mess it up. However, you have inspired me to try something on a smaller scale....so I'm open to all sorts of input and tips.
I rescued 3 large slabs of natural cut timber from the old Beach House, which I will use to make a bench for my study. They need to be trimmed, joined and attached to the wall under the window sill. So I've bought myself a Ryobi drill (with all the trimmings) and will borrow Toyboy's circular saw.
I'm determined to "have a go", and see what skills I can acquire with this small project. I would never have even considered doing this myself, without your inspiration and step by step know how.
One tip that solved a prob for me, was your phot of the overhead cupboard supported by a drawer (or something), to hold it in position whilst screwing it to the wall. I always wondered how you managed that with only 2 hands.
So, thanks heaps Celeste...you truly are an inspiration.
Hi all
Gutters / fascias all painted, Eaves mended (the beading that covers the joins needed replacing, I used left over peices of trellis a
and for extra strength I used screws rather than nails) all painted.
Laundry ceiling 1st coat all done 2nd tomorrow.
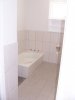
I gave the old bath a big scrub today see B4 photo will post after tomorrow.
Sorted out how I am going to fix the window frame were the air con was.
Started making the window sill for the kitchen.
more later
Sailor, how thick is the wood you are working with?
Gutters / fascias all painted, Eaves mended (the beading that covers the joins needed replacing, I used left over peices of trellis a
and for extra strength I used screws rather than nails) all painted.
Laundry ceiling 1st coat all done 2nd tomorrow.
I gave the old bath a big scrub today see B4 photo will post after tomorrow.
Sorted out how I am going to fix the window frame were the air con was.
Started making the window sill for the kitchen.
more later
Sailor, how thick is the wood you are working with?
Attachments
Celeste, tis 60mm thick and is a slab cut from a tree.
Do not attempt to cut that yourself, even 40mm solid wood is difficult, I had to call in help with my IKEA bench tops on reno.1 You need a big cutting machine to do it properly and acurately..
Mark up what you want and where the joins are and take it to a cabinetmaker or furniture maker, dress like a girl (not overalls) when you talk to them, they need to be male for this bit. flirt a little and I bet they do it for you for free!!! Worth a go anyway.
And for any feminist out there.. it's nice to think all thing are equal but they're not.
One needs to use all assets at thier disposal... L.O.L
Note. I apparently do this
But I am unaware of it Hubby thinks it's so funny to watch.....Today was a bit boring..
Removed all the skirt tiles in the laundry, 2nd coat on the ceiling, sanded all the walls and washed then, under costed door / window frames and cut in the wall color. Should finish the laundry ready for tiling tomorrow.
Here's a couple of photos -
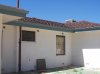
1. gutters and fascias after
2. This is the handy little tool I used to remove the skirt tiles
the last one is my spare time project I just finished last night. It's a cross stitch.
Removed all the skirt tiles in the laundry, 2nd coat on the ceiling, sanded all the walls and washed then, under costed door / window frames and cut in the wall color. Should finish the laundry ready for tiling tomorrow.
Here's a couple of photos -
1. gutters and fascias after
2. This is the handy little tool I used to remove the skirt tiles
the last one is my spare time project I just finished last night. It's a cross stitch.
Attachments


First you flirt, then remove the skirt ...Removed all the skirt
First you flirt, then remove the skirt ...
Go on Celeste, dish the rest of the dirt..
Hi guys
Well I've been busy researching ways to off load the reno's as the market in the area had stopped, I came across Rent to Buy.
I sussed it all out and gave it ago on the weekend, 1 ad in the sunday times for sale and a pointer ad in the to rent section. Then I had my normal home open Sunday. Now I thought people would not know what it was so I spent 3 hours doing up a very snazzy facts flier and worked out 3 different option.
It went really well, I had 3 enquiries and they all knew how it worked and have been looking for properties sold this way. If it had been a 4 bedder it would have gone on the weekend, 1 guy's finances just do not add up, and 1 was and internet enquiry I only spotted it late last night. It was from my Domain ad, which I had let expire but it must still be there.
Anyway, as it happened my REA rang Saturday, the young couple that he had thru last weekend are apparently putting in an offer today and the one that wanted the 4 bedder is going to ring me tonight to see if it is still on the market.
Turns out rent to buy is a good way to sell a property in a down market. I may be able to shift reno 2 quickly this way.
I have also been working like mad on the reno.
laundry all painted and tiles all layed, first time I have seen anyone tile and I found out I am not so slow at it after all - still I have decided that I do not really like it and will be subing it out.
Patio going up Wednesday, I moved all the 600 x 600 slabs from where the old shed was and relayed them at the side of the house next to the carport for the new shed.
Dingo fellow came friday (the one that posted here a little while ago Carl) Popped in the soakwell ( there was a down pipe that just emptied on to the pario?) and he scrapped around the back and front yards to level them out a bit more, so there is less work for me when I prep them for the roll on.
Thats all for now, will post later, hopefully with good news.
Hi guys
Sorry no post for a while, I have been soooooo busy.
Between sanding and painting like mad, I have been showing and talking to people re Rent to Buy. Good news I signed someone up to day!! Not even 1 week after my one and only ad. Excellant!! They are thinking thier daughter might like to take on next door also.
and I had yesturday off, sort of. Paper work!!
I ordered all the blinds, bench tops have been delayed!!
So, therefore not looking good to have the electrician and plumber back B4 Xmas
Patio all up and makes a big difference when you walk out the back door.
I fixed up the window where I took out the aircon - a big bit of the frame had been hacked out to fit the aircon.
I've been dropping around building sites looking for a brickie to make a back step for me - no luck yet all to busy!!
Monday the shower screen will be installed and installing the glass back into my repaired window.
Next week looks busy, Monday showerscreens etc. I also have someone coming to look at the unfinished reno in regards to - rent to buy.
meeting with my new tenant / buyer tuesday to sort out the finer detail ready for the solicitor, order my doors, find someone to hang them.
I need to met with the solicitor to draw up the option, find some time to do xmas shopping whilst the little one is still at school (last day thursday!!) I need to make the xmas pud - that's 4 hours cooking time!!
cook / wash /clean / etc etc etc. and in my spare time I will be painting painting painting.
A Women's work is never done!!!! Heheheheh and I am loving every minute of it.
Sorry no post for a while, I have been soooooo busy.
Between sanding and painting like mad, I have been showing and talking to people re Rent to Buy. Good news I signed someone up to day!! Not even 1 week after my one and only ad. Excellant!!
They are thinking thier daughter might like to take on next door also. and I had yesturday off, sort of. Paper work!!
I ordered all the blinds, bench tops have been delayed!!
So, therefore not looking good to have the electrician and plumber back B4 Xmas
Patio all up and makes a big difference when you walk out the back door.
I fixed up the window where I took out the aircon - a big bit of the frame had been hacked out to fit the aircon.
I've been dropping around building sites looking for a brickie to make a back step for me - no luck yet all to busy!!
Monday the shower screen will be installed and installing the glass back into my repaired window.
Next week looks busy, Monday showerscreens etc. I also have someone coming to look at the unfinished reno in regards to - rent to buy.
meeting with my new tenant / buyer tuesday to sort out the finer detail ready for the solicitor, order my doors, find someone to hang them.
I need to met with the solicitor to draw up the option, find some time to do xmas shopping whilst the little one is still at school (last day thursday!!) I need to make the xmas pud - that's 4 hours cooking time!!
cook / wash /clean / etc etc etc. and in my spare time I will be painting painting painting.
A Women's work is never done!!!! Heheheheh and I am loving every minute of it.
Wow, I am so impressed. I have just read your entire thread and can't believe you are doing all this yourself! You are putting us mere mortals to shame.....I can do a few things but you have surpassed all that! How long have you been doing your own renos for and how did you learn?
But wait there's more....she's a mum.....she cooks......she handles the paperwork like a pro...... she does needlecraft......you must have men lined up for you
But wait there's more....she's a mum.....she cooks......she handles the paperwork like a pro...... she does needlecraft......you must have men lined up for you
Couldn't agree more with Elkays' post. Great work Celeste.Wow, I am so impressed. I have just read your entire thread and can't believe you are doing all this yourself! You are putting us mere mortals to shame.
Regards
Marty
Hi guys
Sorry no posts for a while.
Anyway, keep the paise coming, I only do it for the pat on the back - profit thats a bonus,!!! L.O.L
I have a few stories to tell ( I wouldn't be a REA full time for quids), I am a little piddled at the mo and tired. I will be having a break over xmas / new year and will do a big update with photos over that time.
Other than that Merry Xmas to all and a Happy New Year!!!