Brisbane North - Purchase and Renovation

Agree that replacing it is the best solution. The initial plan was to gut the bathrooms and do a bit of a re-design, but now we are just painting the walls, spraying the bath tub and replacing the vanity. This gives some wothwhile savings across 3 bathrooms.

The painting of the bathroom was not separated - but all up we would be spending around $5K total on the 3 bathrooms.


It is a combined kithen and laundry as currently there is a shared laundry only.
We are using "arms" from this site (kitcheninabox.com.au) who is a wealth of information about a whole lot of areas and really helpful. May he can describe the setup better than I can.


Sounds like a great idea, 5 grand to lift up the look of three bathrooms, or 21 grand ( approx) to gut and replace, plus loss of time.
I'll look up the kitchen blokes site, my last kitchen I purchased was an awesome deal threw a mate, hopefully he's still in the cabinetry game, been a while since I've seen him. How is your asbestos sheeting joins hidden? Has it got those asbestos stripping along the joins? I think I might take a leaf out of you book and give it a lift instead, I'll end up over capitalising and it may not change my rental yield.

aluminium joining strips between the asbestos ,trick is to use a marine grade primer and topcoat ,this way you can be assured no barnacles will grow on the surface
 
aluminium joining strips between the asbestos ,trick is to use a marine grade primer and topcoat ,this way you can be assured no barnacles will grow on the surface

Cheers mate, I'll google it. Interested to see what affect it gives the bathrooms appearance.
 
Cheers mate, I'll google it. Interested to see what affect it gives the bathrooms appearance.

bathroom looks larger ,clean lines and of course the cost advantage ,
the basic structure of the bathrooms were sound with only one room having a cracked wall ,that's why I suggested it ,why pay dough when you don't have to .I know linda is packing **** about the result but I have done the same thing in several of my ips .the great thing has been linda and david getting a painter with the knowledge to back up what I suggested .
 
The finished product is starting to come into view now and it is looking better than we were aiming for.

The bathroom came up really good - although the enamel paint for the baths cleared the site for a couple of days, really toxic stuff. I'll get some pictures of the paint job up later - but the walls came up really well.

A bit depressing reading all the deals everyone is doing with 7.5% yields straight away. Even after all these hard yards we will get nowhere near that.
 
Last edited:
A bit depressing reading all the deals everyone is doing with the 7.5% yields straight away. Even after all these hard yard we will get nowhere near that.

I wouldn't worry too much about it.

Pretty sure you will be getting some nice capital gains in the next couple of years, and increased rent (and yield on purchase price) will soon follow!
 
A couple of in progress photos of the exterior and bathroom - the start of the thread has the before photos.

Just pulling things together - the last 20% that is so hard to finish.
 

Attachments

  • David iPhone 053.jpg
    David iPhone 053.jpg
    95.5 KB · Views: 265
  • David iPhone 056.jpg
    David iPhone 056.jpg
    98.3 KB · Views: 227
  • David iPhone 050.jpg
    David iPhone 050.jpg
    87.6 KB · Views: 253
Still going on the renovation !

Just about all done but still some minor issues to be resolved.

No real surprises which is good - a good building inspection and the renovation plan helped create that - but there always seems to be something extra that makes a lot of sense to do.

Taking on something like this interstate has been exhausting but all up very happy with the result.

Hope to pull the numbers together over the next week - definitely spent a bit more than planned and took about a month longer - but hopefully the market and the rentals will be good to us.
 
Good one Linda, Looking forward to seeing it in the flesh this weekend! Glad your Renovation Action Plan was useful. Thanks for keeping us all up to date with progress.
 
This project was finished over Easter and one unit is leased out - there is sufficient interest to believe the other 2 will lease out shortly.

The gross yield based on full costs (including holding costs) will be about 6.8% which is what we were expecting. Like always the renovation took longer and cost more than expected but the rental income is also higher.

Most things went to plan - at the end we decided to fence off the back yard to create coutyards and also laid "grassprotecta" across the front lawn to create some additional parking spaces. We also decided to paint the asbestos roof to extend its useful life.

The only thing untouched on the entire property is the bathroom tiles. The electricals and plumbing have been largely replaced - if we had read Tim86's reno thread earlier we probably would have looked into lifting the whole property.

Looking forward to a quiet weekend at home.

Attached are some final pictures.
 

Attachments

  • DSCN3392u.jpg
    DSCN3392u.jpg
    83.9 KB · Views: 243
  • DSCN3395.jpg
    DSCN3395.jpg
    85.5 KB · Views: 225
  • DSCN3404.jpg
    DSCN3404.jpg
    97.8 KB · Views: 211
This project was finished over Easter and one unit is leased out - there is sufficient interest to believe the other 2 will lease out shortly.

The gross yield based on full costs (including holding costs) will be about 6.8% which is what we were expecting. Like always the renovation took longer and cost more than expected but the rental income is also higher.

Most things went to plan - at the end we decided to fence off the back yard to create coutyards and also laid "grassprotecta" across the front lawn to create some additional parking spaces. We also decided to paint the asbestos roof to extend its useful life.

The only thing untouched on the entire property is the bathroom tiles. The electricals and plumbing have been largely replaced - if we had read Tim86's reno thread earlier we probably would have looked into lifting the whole property.

Looking forward to a quiet weekend at home.

Attached are some final pictures.

Congratulations on your achievements Tonibell. its looking awesome, now time to kick back and enjoy the fruits of your hard work.

just wondering if its possible to get a few contacts for the trades you used? i'm looking for a plumber, floor sander & polisher and someone that can reno a bathroom.

cheers
Jerry
 
Thanks Jane.

Rudi came back to have a look at it - he thought he could make us around 15% on our investment if we sold it now, told him that wasn't worth it for the effort involved !
 
Hi Jerry,

Thanks for your comments - unfortunately as always the tennants enjoy the fruits of our labour while we continue to live in squalor. A PPOR reno is definitely up next (be calling soon on this Jane - we need a good plan !).

Definitely have a great Russian floor sander that we would highly recommend.

The plumber came to us via a recommendation Wylie was also excellent - but is very busy.

For our bathrooms we :

- had the walls painted (painter),
- the bath sprayed (re-sprayer)
- new shower screen (glass guy)
- replaced the vanity / toilet (plumber)
- new door,mirror, towel rail etc (excellent carpenter/handyman - hear of the project)

We did not use a tiler (kitchen splahback was a Visselle glass piece from Bunnings - installed by carpenter).

We also put in internal laundries with Arms from here providing the cupboards and the plumber installing the taps.

So the contacts would depend on what you want you want to do to your bathroom.

I'll post the details of them tonight when I have all the info in front of me - worried I'll get something wrong if I go from the top of my head.

hi Tonibell

at this stage i'd like contacts for the floor sander, plumber and someone that does shower screens. and also the guy that did the re spray for the bath. how did the re-spray turn out? was the results as expected?
 
Last edited:
Linda,

Wow great job. I love multi sites as well. Your return is good and given you don't have three lots of strata your net yield will be better overall.

Inspiring...

Vicki
 
hi Tonibell

at this stage i'd like contacts for the floor sander, plumber and someone that does shower screens. and also the guy that did the re spray for the bath. how did the re-spray turn out? was the results as expected?

Below are the tradies we used - the bath came up like new but the smell of the paint used literally cleared the site for 3 days. It really burns the eyes and sinuses. Very happy with the result.

Floor sander was great also - came highly recommended to us and did a great job. We did all the prep of removing staples etc to keep costs down.

Plumber doesn't want recommendations - too busy.

Let me know if you need more details to contact them.

Attached are a couple of bathroom pictures.

Budget Shower Screens
Phone: 1300 727 791

A.S. Floor Sanding Plus
Aleksander Siedelcki
 

Attachments

  • Bromm1.jpg
    Bromm1.jpg
    79.9 KB · Views: 230
  • Broom2.jpg
    Broom2.jpg
    95.1 KB · Views: 171
Last edited:
Just noticed this tread.

Re the painting of the asbestos sheets in the bathroom I can give my experiences over 7 years for Jane and the others who queried the success of painting. Mine was the flat finish and small gold on white patterned look.

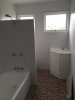
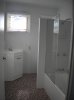
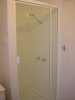
I sanded wet with a couple of grades of wet and dry - thoroughly to remove scum build up which was hard like calcium, not grease. See photo before. I primed and painted the shower area with White Knight tile paint and a different good quality primer and standard semi gloss Dulux paint for the rest of the bathroom walls.

The bathroom walls are holding up good other than the odd small scratch - epoxy glue is about the only thing I can think of that would really stick rock hard to the asbestos sheet surface.

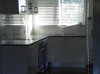
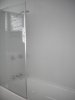
The shower area came up terrific - small nap mohair roller gives a spray gun finish ...and a fussy painter :D 
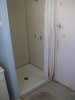
The aluminium corner strips were painted in the same way, did not try sealing any minute gaps as this would cause greater issues with painting over. The bottom edge strip was a different story - half corroded away. I cleaned up the best I could and painted, knowing it would be the first area to need redoing. I had considered covering it but did not want to seal the bottom of the wall to the shower base as this is where any water would escape if it got behind the taps or past the corner strips.

Since then I have had to repaint sections of the shower where paint has been scratched or the odd bit has lifted - twice I think. Only minor, but a partial paint improves the look. I did not do a total repaint as this would have required a lot more prep work - although look better. The enamel paint will yellow with age and a touch up is noticeable, but time remedies this. As for touching up, it is impossible to feather the edge on the peeled/chipped paint - you will end up in the kitchen chasing the edge as it keeps peeling (not a prep issue). Sand as smooth and fine as possible, and after a light sand of undercoat and first top coat half of the edge disappears anyway. I phoned White Knight - Taubmans and asked if there was a better primer that gripped the asbestos sheeting better, I was told that was as good as it got and a very good primer. He said there is a limit to the surfaces paint will adhere to and degree of adhesion. Note: soap dripping onto the paint will eat it away and cause it to bubble/lift - I had to change the soap holder to prevent this.

I am amazed how well the paint stands up to grime build up and cleaning. Although I request tenants not to use abrasive cleaners I doubt if they take any notice, and even when sanding with wet and dry it takes a fair bit of rubbing or a courser paper to take the shine off it.

The lower aluminium strip edge looked daggy after a few years as hard to clean along a half corroded strip :mad: I ended up spending a couple of hours tearing what I could off with pliers and bending the remaining sharp edges back under the sheet - bugger of a job. I then bought some plastic quad strips from Bunnings and placed them around the bottom of the shower - siliconed on. This covered the horrible edge and sealed up the gap between bottom of sheeting and shower base - as visible in after paint photo before the quad was fitted - a few years later. Looked good and I have not had any problems with water behind the sheets and not able to drain - although I did make some covers to fit behind the tap flanges to minimize any water getting inside wall sheeting.

All up, a cheap way to improve the look of the asbestos sheeting even if the is some upkeep and cost involved. It actually looked a lot better after cleaning before painting :)
 

Attachments

  • bathroom before .jpg
    bathroom before .jpg
    110 KB · Views: 205
  • new pivot shower screen and White Knight tile paint.JPG
    new pivot shower screen and White Knight tile paint.JPG
    74.2 KB · Views: 254
Last edited:
Thanks for that Beachside. It's good to hear how you made it work. Your photos look great.

Upon seeing the final finish on Linda's bathroom, I'm not sure I would recommend a paint finish over Asbestos (or otherwise) sheeting. It did look ok, but I would really only recommend for low value properties (under say $350k) as it could do more damage than good. I'm really just mentioning that for other renovators out there considering doing the same thing.

Fortunately the rest of Linda's project looks fabulous, so she's been able to get away with it. As she mentioned though, budget was an issue in this case (isn't it always?!):D and IMO she has definitely done the best she could to the property within her budget.
 
I agree. I would be hesitant painting tiles, kitchen cupboard doors etc as well, if I can pick it I know others will - even if not all. To me this equates to $ reduction as it is only a tart up. The same goes for spraying baths etc - but I'm too practical. A painted surface always has the potential to chip, scratch and peel to reveal what is underneath, and white enamel paint yellows - the paint used in spraying (2 pack?) is probably ok, but still a tart up. Doing a place up to flick and painting tiles, cupboard doors and baths serves the purpose of appearance rather than long lasting practicality. Otherwise to hold - I would prefer to spend the extra money and do the job properly.

With my bathroom, I would not have been confident in tiling the asbestos (Tilux) sheeting - not enough rigidity and corner metal joiner strip would be an obstacle. To replace those with normal wet area wall board .........one thing connects to another, to another and to another. Where do you stop short of a full bathroom reno in an original 70's bathroom? A quick and cheap solution for the time being when I first bought the property and get it rented asap (and with a reasonable bang for buck) was to replace shower curtain with screen and paint the tilux - about $380 worth all up. Makes it much more rentable. Going the whole hog would only add about the same value again in rental on top of what $380 did. Sub $350k property...well an truly! I later tiled the floor - originally lino tiles on wooden floor - cost me $127 all up doing it myself, porcelain tiles on cement sheeting. If I do any more to bathroom it will be the full works from floor to ceiling inclusive.
09 bathroom before.jpg10 bathroom after.jpg

Linda might redo the bathrooms in full in 10 years, therefore get reasonable value over that time for what she has spent, then have brand new bathrooms rather than 10 year old, adding more value :)
 
Last edited:
Back
Top