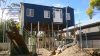
My PPOR Renovations

Bloody hell wanna hope you dont get any stiff breezes!!!!:)

cheers
watto

Shouldn't there be some cross-bracing there? :eek:

Are you really doing the stumping yourself? Are you covered if something goes wrong? I'm guessing a house lifter put it up on styes, and that by DIY you perhaps are installing the steel? Is that the case?
 
Last edited:
Yeah I didn't raise the house, I got black and white house raising to do that. To get someone to do the whole job including stumps we were getting quoted around 90k. Instead it will cost us $20k. Me and my dad sourced the steel and are installing all the stumps. Have had 10m3 of concrete so far and another 6.5m3 to go tomorrow and then that's it. We put up two 8.3m posts for the deck today... That was fun. Ridiculously heavy stuff.

I'll be cross bracing it with a whole heap of 90mm pine which I will later use for wall framing for downstairs, but I'll need something up first so the stacks can come down next week.

And getting up to the front door is easy lol not suitable for those who are afraid of heights :p
 
Stacks have been removed. Now to do the deck and then install the front staircase so I can get back into my house :)
 

Attachments

  • DSC_0130.jpg
    DSC_0130.jpg
    105.4 KB · Views: 403
Looking at that makes me a little nervous.. remember how windy it was last weekend? :eek:

I'm only seeing one brace in the front/back direction.
How did you connect the pine bracing to the steel posts?
 
Looking at that makes me a little nervous.. remember how windy it was last weekend? :eek:

I'm only seeing one brace in the front/back direction.
How did you connect the pine bracing to the steel posts?

8 lots of bracing all up, each bit of bracing involves 2 lengths of 90mm pine. There are 4 lots of bracing front to back. We will be putting 4 more lots of bracing in the front to back direction down the hallway tomorrow.

And connected with 65mm hex head screws 2 screws for each join on each post (so 2 at either end of the bracing and 2 on the middle post).
 
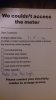
I can't believe this, all of a sudden the electricity company won't read my meter any more just because I raised the meter box 7m into the air. Excuses excuses...
 

Attachments

  • meter.jpg
    meter.jpg
    94.7 KB · Views: 289
It's starting to take shape. Hopefully the staircase will be done on Tuesday and we will be back up in the house. I'm taking 6 days leave starting tomorrow so I'll be up nice and early to try and finish off those landings. We also just hooked power back up after dropping the power box and solar box. Can't wait to have a hot shower again. Living in the tiny half demolished old back extension with just a bath tub and a bbq for a few weeks has not been pleasant...

(note if the front steps look wonky, that's just because they are hanging there temporarily so we could work out heights, etc...)

---also just added a pic of the decking, I think it's pretty nice for $3.50 per lineal meter, and the view out the front from up the top and the backyard (the shed will be going and being replaced by a bit of a basketball court and the back deck should finish a few meters before those trees so you are surrounded by trees - also you can see the brick granny flat out the back of our IP which our house backs onto, will be easy to keep an eye on the tenants haha).
 

Attachments

  • house with steps.jpg
    house with steps.jpg
    98.1 KB · Views: 376
  • decking.jpg
    decking.jpg
    99 KB · Views: 333
  • view out the back.jpg
    view out the back.jpg
    99.7 KB · Views: 312
  • view out the front.jpg
    view out the front.jpg
    93.2 KB · Views: 302
Last edited:
Have the steps up and we're back in the house now :)

Starting on the bathroom upstairs now.

Costs so far with the bathroom:

Vanity $500
Taps and plug and wastes $1000
Bath tub $700
Shower screen $280
Tiles $1500
Heated towel rail $150
Chandelier $300
Mirror $100
Fibro $400
Random materials (water proofing, shower combination, timber, etc...) $1000

Bathroom total price should hit $5930

I'll post up progress pics of the bathroom as I go. I'm currently just trying to get the shower done, I'm sick of only having a bath in our temp bathroom. Shower is up to the stage of being able to waterproof it now so I'll be doing that tomorrow.
 

Attachments

  • DSC_0153.jpg
    DSC_0153.jpg
    90.5 KB · Views: 272
  • DSC_0158.jpg
    DSC_0158.jpg
    100.2 KB · Views: 224
  • DSC_0159.jpg
    DSC_0159.jpg
    99.4 KB · Views: 208
WOW! That's a pretty big job.

Did you get any neighbour objections because of the height?

You mention renting out the bottom. Is that legal in Queensland? In NSW you'd have to have fireproofing between the levels and no connection.
I'm assuming you will put a kitchen upstairs?
 
To answer some questions, the neighbours didn't have an opportunity to object as it's in a 1 in 100 year flood zone so the max height is 9.5m. So it was all well within planning guidelines. But with that said all the neighbours I've talked to have been really supportive. I get a lot of people from the neighourhood slowing down in their cars to stare, the funniest one was a guy riding past on his push bike and as soon as he saw the house he went "bloody hell!" ...... lol it is a lot higher in person than you can see in the pics.

As for renting out downstairs seperately, it is illegal in qld, however we will technically be doing it as boarders set up, which is perfectly fine.

And yes kitchen is going upstairs in the extension we will be building in about 6 months. We already have the kitchen, it's a french provincial style one, set us back a cool $16 000... but it's very nice :)

Anyway most of the shower cubicle is done now. I got the tiling done before heading off to work today and my wife did the grouting for me :) 
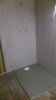
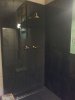
Those porcelain tiles are very unforgiving, but with a lot of luck I managed to tile them pretty damn straight if I may say so myself. Now it's just a matter of waiting for the grout to dry and putting in the glass pannel and then finally after over a month I can have a shower again and not have to rely on the stupid damn bathtub :D

The pics aren't great quality, I'll post up some better quality ones when I get the chance.
 

Attachments

  • water proofing.jpg
    water proofing.jpg
    116.1 KB · Views: 223
  • finished shower.jpeg
    finished shower.jpeg
    31.1 KB · Views: 264
Bad news with the shower. I thought I followed all the right steps but the shower pan is leaking. I think I must not have put a thick enough layer of water proofing on, or the concrete base has cracked due to movement in the floorboards or something, but it's a decent leak. I'll have to jack hammer up the shower base and start again. Very disappointing. And it's probably about a $250 screw up. Oh well at least I'll learn something from it. But it's a real shame.
 
Bad news with the shower. I thought I followed all the right steps but the shower pan is leaking. I think I must not have put a thick enough layer of water proofing on, or the concrete base has cracked due to movement in the floorboards or something, but it's a decent leak. I'll have to jack hammer up the shower base and start again. Very disappointing. And it's probably about a $250 screw up. Oh well at least I'll learn something from it. But it's a real shame.


Bugger, that's a damn shame. Hate having to re-work stuff.

Did you concrete directly over the floor boards or on top of some fibro sheeting? I ended up having to use a flexible rubber joint thing for my shower at one stage due to constant movement in "P" class highly reactive clay.

Looking great so far.

Concrete on floorboards, then waterproofing, then more concrete, then tile.

Next time it will be: fibro, waterproofing, concrete, HEAPS of waterproofing, more concrete, some more waterproofing, and then tile.
 
Back
Top