Install the app
How to install the app on iOS
Follow along with the video below to see how to install our site as a web app on your home screen.
Note: This feature may not be available in some browsers.
You are using an out of date browser. It may not display this or other websites correctly.
You should upgrade or use an alternative browser.
You should upgrade or use an alternative browser.
I'm Doin' it!!
- Thread starter battler
- Start date
More options
Who Replied?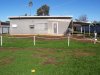
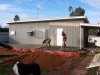
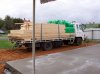
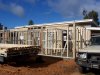
We boxed for the concrete on Tuesday, poured on Wednesday, came home(250k), came back with the loaded truck on Thursday, and on Friday started framing. Pics taken Fri, Sat, and Sun, a 3 day job so far.
It will slow down now until we get the power transferred to the new fascia before we can put the roof on.
It will slow down now until we get the power transferred to the new fascia before we can put the roof on.
Attachments

Last edited by a moderator:
Neat ... looks like you're just finishing the original job. They forgot to put the front half of that little house on when they built it, right?
Excellent pics thanks battle, would love to see more.
It looks so simple to put up framing but im sure thats not the case when it comes down to it. Did you do the framing yourself? Where do you get it pre-assembled like that?
Any suggestions would be greatly appreciated as Im studying how to do this myself next year and hopefully can do it on a budget.,
Cheers
Brettus,
Framing is simple enough, what we do when we buy something like this, is apply for planning permission, in this case an extension plus another house in the rear.
While the bureaucracy procrastinates, we measure up for what we intend to do and as decision time gets closer, we take specific measurements for the extension.
Once approved, I order timber etc as we make our own wall frames, then order roof trusses from a manufacturer; contact my Sparky, plumber and concreter to let them know something is going to happen (finally!)
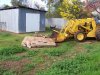
In this case we needed to remove a tree and a concrete porch base, so I loaded the backhoe on the truck and moved it on site. Once the site was clear I was able to dig the footings for the slab, and it has progressed from there.
We made a bit of progress today despite mum having to return home the last couple of days, as our son ended up back in hospital again with diabetic complications.
Still waiting on the power mob to change over to the new fascia before we can put the roof on.
Brettus, I am happy to pass on what I have learned to you, just ask.
Framing is simple enough, what we do when we buy something like this, is apply for planning permission, in this case an extension plus another house in the rear.
While the bureaucracy procrastinates, we measure up for what we intend to do and as decision time gets closer, we take specific measurements for the extension.
Once approved, I order timber etc as we make our own wall frames, then order roof trusses from a manufacturer; contact my Sparky, plumber and concreter to let them know something is going to happen (finally!)
In this case we needed to remove a tree and a concrete porch base, so I loaded the backhoe on the truck and moved it on site. Once the site was clear I was able to dig the footings for the slab, and it has progressed from there.
We made a bit of progress today despite mum having to return home the last couple of days, as our son ended up back in hospital again with diabetic complications.
Still waiting on the power mob to change over to the new fascia before we can put the roof on.
Brettus, I am happy to pass on what I have learned to you, just ask.
Attachments
good to see someone else tackling the nuts and bolts of reno's.
nice work - looks good.
nice work - looks good.
Thanks Battler, it looks like your getting it done pretty quickly!
So framing seems not too hard, I suppose I could just study other building sites that are at the framing stage so I get the details / sizes joins right. Is this something that needs to be passed by a building inspector before completion?
Also, at what stage are you going to remove the existing cladding where your new framing meets it? I thought you would need to have it off already so you can secure new frame to old frame???
Hopefully your son gets better quick too, I have a little boy now so i know that must be hard when they get sick.
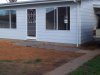
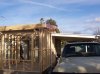
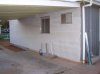
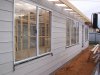
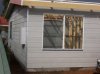
Today we put the windows and front door in, the weather is still kind to us. and got the front clad.
Still no news from the power mob, but we're not held up yet.
Brettus, framing is not hard, get yourself a copy of the Timber framing code, study it , and then have a look on site so it makes sense, however these days if your building a new home as against a renovation, it's probably cheaper and easier to get factory made walls and trusses.
Building inspections are generally at footing trenches, then after the reinforcing and before a slab is poured, then the frame, then a final, when it's finished.
The existing cladding stays in place on the front wall ( in this case), but when we removed the cladding on the sides to install insulation, and continue the new cladding, I used some allthread to bolt the two halves together. The new slab has 16mm deformed bar inserted into the old slab at 450 centres, extending into the new slab, to keep floor levels consistent.
and got the front clad.Still no news from the power mob, but we're not held up yet.
Brettus, framing is not hard, get yourself a copy of the Timber framing code, study it , and then have a look on site so it makes sense, however these days if your building a new home as against a renovation, it's probably cheaper and easier to get factory made walls and trusses.
Building inspections are generally at footing trenches, then after the reinforcing and before a slab is poured, then the frame, then a final, when it's finished.
The existing cladding stays in place on the front wall ( in this case), but when we removed the cladding on the sides to install insulation, and continue the new cladding, I used some allthread to bolt the two halves together. The new slab has 16mm deformed bar inserted into the old slab at 450 centres, extending into the new slab, to keep floor levels consistent.
Attachments
I used some allthread to bolt the two halves together. The new slab has 16mm deformed bar inserted into the old slab at 450 centres, extending into the new slab, to keep floor levels consistent.
Tisk, Brettus, even I knew that you have to do the deformed bar thingy something or other centre holders extending the slab to 450........yeah that stuff that battler said - I knew that! Didn't you?
Hope the boy is getting better battler - a spoon full of sugar will do the trick....according to the Julie Anthony song anyway (I suppose you should not take medical advice from a song though)
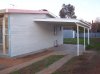
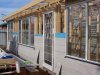
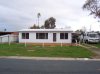
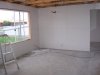
We've made some more progress, the power has been changed over, electricals are roughed in and all the roofing is finished.
Storm water is connected, split system is roughed in (so no external ducting) insulation is in and its had one coat of paint.
Plaster should be here in a couple of days and I will proceed with that.
Storm water is connected, split system is roughed in (so no external ducting) insulation is in and its had one coat of paint.
Plaster should be here in a couple of days and I will proceed with that.
Attachments
Hi all,
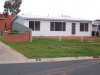
Excellent job Battler, turning an ugly cheap looking duckling into a gosling if not a swan.
Can you give us an idea of size bd count etc on the before and after, plus the different expectancy of rent.
Oh well, may as well ask for it all, costs, added value, mothers maiden name, etc.
bye
Excellent job Battler, turning an ugly cheap looking duckling into a gosling if not a swan.
Can you give us an idea of size bd count etc on the before and after, plus the different expectancy of rent.
Oh well, may as well ask for it all,
costs, added value, mothers maiden name, etc. bye
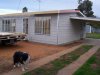
Bill, It was a single bedroom, kit/lounge, bath/laundry of 50sqm.
We have added 2 bedrooms and a proper lounge across the front, accessed through where the original front window was, of 47 sqm.
We have never rented it but it was rented for I think $90pw, history says it should rent around $180 when finished. We paid $90k for it and will spend $30k on this addition including the costs for DA approval, which we have in place, to build the second house in the rear yard.
Maiden name was Reynolds.
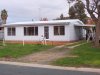
We finished the front path today using pavers that were cemented to the original front concrete step. I initially pushed this to the rear of the block before we built, and then peeled the pavers off with the backhoe for reuse.
When the rear of the house is reclad I will push the concrete base into position and build a garden shed to fit it .......waste not want not
When the rear of the house is reclad I will push the concrete base into position and build a garden shed to fit it .......waste not want not