Hi
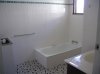
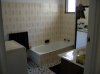
I’ve just finished a bathroom reno for an IP using the white knight tile paint and am really happy with the result. I’ve never used it before and had my first go at tiling and grouting too (adding a small decorative strip of tiles over the top) – it was fun (just takes a bit of patience)!! So I’ll spell out the process in a bit more detail for those who might be thinking of trying it but have never used the stuff.
I painted the ceiling and wall first (2 coats), then washed all the tiles with the cleaner that’s part of the white knight “system”. As others have said this is really important to do properly so that the primer sticks.
Primer took ages to put on but is easy to work with and just requires a brush. I was really careful to get it into the grout lines as well so it took about 3h but mine is a pretty big bathroom. Half way through the shower I realised that the previous owner / handyman had gone wild on the silicone and the primer will not paint over that. I had to wash the primer off again and decided to leave the original tiles in the shower bare (luckily they were ok and uni-colour).
I then glued the decorative tiles above the existing tiles and let that dry over night. Next day I started the first coat of the tile paint. As others have said it’s quite viscous and dries quickly. Initially I used a brush but I just couldn’t get the coat thin enough so that it wouldn’t run down the tiles.
So in the end I used a “little ripper” (10cm long) mohair roller (which is meant to work with enamel paint) in one hand to put the paint on and a brush in the other hand. The roller allowed me to get the paint on thinly but did leave lots of little bubbles (maybe try the finest foam roller you can find but I didn’t have one). I ended up covering about 0.5m2 at the time with the roller and then running the brush over it to smooth out the finish. This worked really well as I needed the brush anyway to cut in at the edges and around taps etc. The other big advantage of the roller is that it breaks the skin of the paint easily (dries over very quickly) and you can wet-edge much easier that way (and go back for another 20mins or so without leaving permanent marks). Trying to wet-edge with the brush alone left streaks I found.
The tin said 6h between coats but I thought after that time it was still a bit sticky so I left it over night and then put the second coat on. Same procedure and it took just as long again. 3h each coat and the primer … yes, it’s not a quick process! Left the second coat over night and grouted the tiles next day. Paint was good and dry by then and grouting didn’t leave any marks, however because of the small size of the tiles I mainly used my hands for grouting anyway (and find myself with very smooth hands today

).
I did the bathroom as part of a larger reno so I could stretch the bathroom reno over 5 days as I had other things to do in between. If you wanted to do this over a weekend you’d have to time things carefully I would say. I’m very glad I gave it a go myself. I had 2 quotes both coming in at ca. $2500 for having it done professionally and I would have still had to paint the ceiling and do the tiling myself. Instead the material for tile painting was less than $150 and I’m happy with the result –so all good!
kaf